


Creation of Security groups, EC2 Instance, adding the ip addresses to inventory file, configure webservice and load-balancer to them, access webpage


Introduction:
In this module, I will demonstrate the power of ansible to create EC2 instance, security groups in AWS, adding their IP address to the ansible inventory file and configure webservice and load-balancer to the dedicated instances and access webpage with the help of loadbalancer’s IP address.
Requirements:
AWS account with aws_access_key and aws_secret_access_key generated
Ansible Installed in controller node
Tasks:
Step 1 : Create security groups, create EC2 instances and add the dns names to inventory file:
- Open the ansible inventory file and create two groups with the name webservers and loadbalancer.

2. Next gather the below information which need to be mentioned in vars_files to avoid displaying them in actual playbook.
VPC ID
Ports to be used for webservice
Ports to be used to configure load-balancer
aws_access_key
aws_secret_key
image_id
key_name
instance_type
region
ssh_key location
inventory directory location
3. Since, no module of aws is included in ansible-core, this need to be dowenloaded from collection with below steps:
ansible-galaxy collection install amazon.aws
Install boto3 and botocore
Refer the link: Ansible galaxy collection
4. Start Developing the playbook. Mention the file name where all variable are included in vars_files section and write the code to generate the security group. Here the security group has been defined to access the mentioned ports from anywhere (which in in-general).

5. Write the code to generate EC2 instance. Here, I have used count and name parameter in playbook. If I omit the count and keep the name, it will generate only one ec2 instance and no further ec2 instance will get generated if I execute it for 2nd time. But if I mention count, it will keep on generating that number of ec2 instances with same name with each execution.
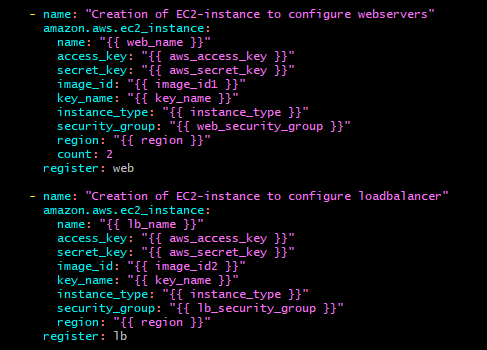
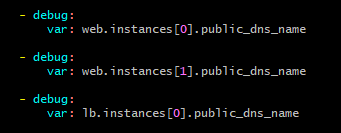
6. I have registered the details in the variables to display the public ipv4 dns names of the generated ec2-instances:
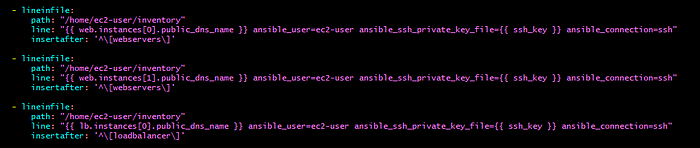
7. Next, I have used lineinfile module to add the DNS names in the inventory file.
8. Now check for the syntax errors with “ansible-playbook — syntax-check playbook.yml” run the playbook with “ansible-playbook playbook.yml” command.
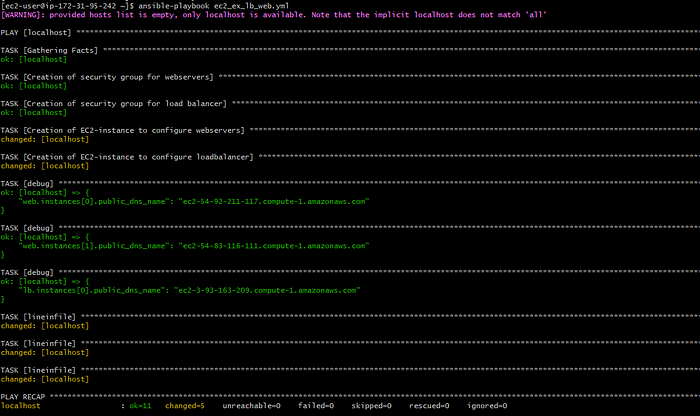
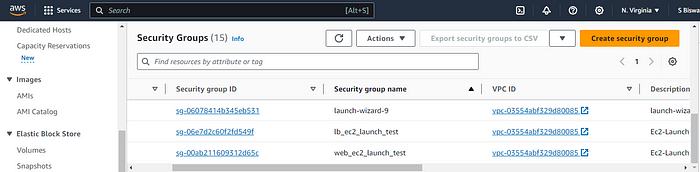
9. We can see that the security groups are created, instances are created and inventory file is also updated.


Step 2: Install and configure webservice and load-balancer and access webpage with load-balancer URL:
In this project, I have used ansible galaxy role to configure the same.
Installed galaxy role with the help of below commands to create the roles for webservers and load-balancer respectively:
ansible-galaxy role init webservice
ansible-galaxy role init loadbalance
3. The above command will create two directories which will have multiple other directories to write variables (in vars/main.yml file), handlers (in handlers/main.yml file), tasks (in tasks/main.yml file), template files (inside templates directory) etc.
[ec2-user@ip-172-31-95-242 loadbalance]$ pwd
/home/ec2-user/loadbalance
[ec2-user@ip-172-31-95-242 loadbalance]$ ls
1  defaults  files  handlers  meta  README.md  tasks  templates  tests  vars

[ec2-user@ip-172-31-95-242 webservice]$ pwd
/home/ec2-user/webservice
[ec2-user@ip-172-31-95-242 webservice]$ ls
defaults  files  handlers  meta  README.md  tasks  templates  tests  vars
4. The default path of the role is /etc/ansible/roles. If the role is installed in any different path, that need to be mentioned in ansible configuration file after roles_path. Here, I have used my home directory as the roles_path and mentioned the same in config file.
roles_path=/home/ec2-user:{{ ANSIBLE_HOME ~ "/roles:/usr/share/ansible/roles:/etc/ansible/roles" }}
5. Next, to configure the webservice, I mention all the variables in vars/main.yml file as below:

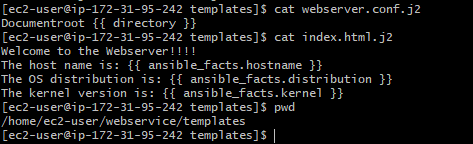
6. Next, in templates directory, I have created a template file index.html.j2 which will be used as webpage and the content of the webpage is to display hostname, linux distribution and kernel name in the webpage. I have created a config file webserver.conf.j2 to define the new document root in place of default document root (/var/www/jtml).
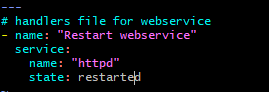
7. In handlers/main.yml file, I have written the below code to call handler:
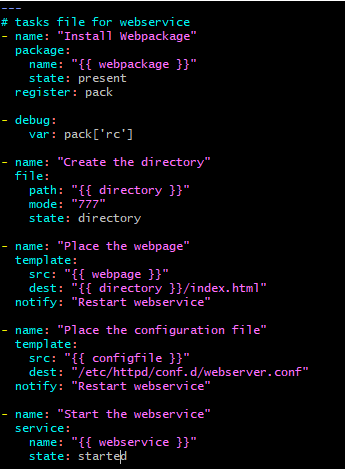
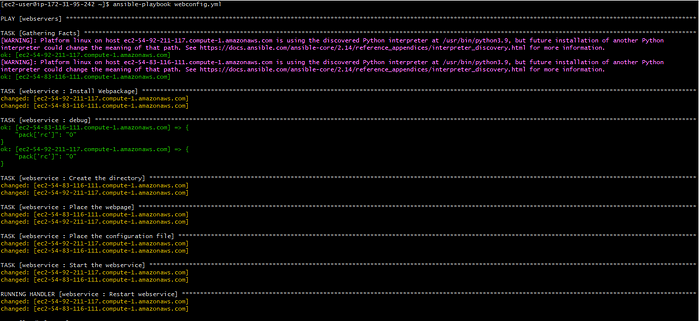
8. In tasks/main.yml file, I have written the below code to install the webpackage, create the new document root directory, place the webpage into it, place the new config file in /etc/httpd/conf.d directory and start the webservice. After the tasks for webpage and config files there is a notify attribute which will notify the handler.
9. In the same way, a playbooks has been generated to install and configure the haproxy loadbalancer. The configuration template file has been created in loadbalance/templates directory.
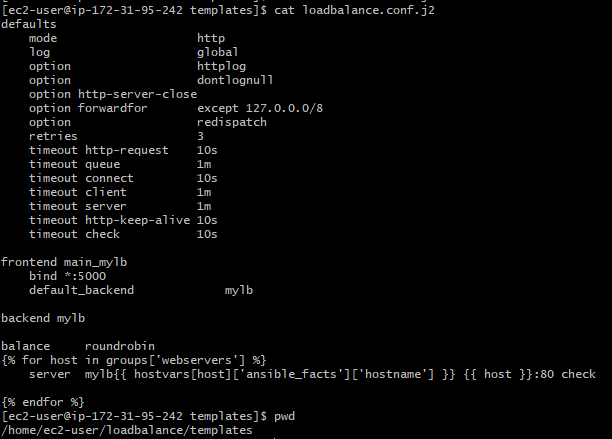
haproxy config file
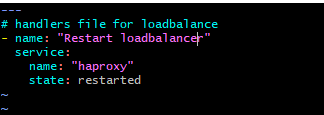
10. The handler file has been written in loadbalance/handlers/main.yml file.
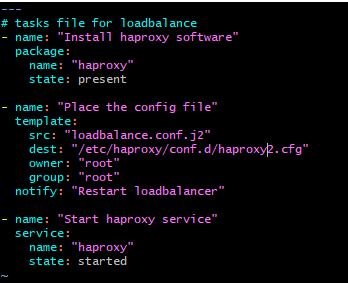
11. The tasks are written in loadbalance/tasks/main.yml file to install haproxy application, put the configuration file in /etc/haproxy/conf.d location and start the haproxy service and to notify the handler to restart the service in case of any configuration change.
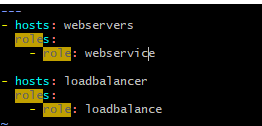
12. After all these done, I have created a new playbook out of all these folders from where I can execute the ansible commands to run there roles.
13. Once after the execution I can see that the webpage is displaying the expected result.


Thank you!!!!